| View previous topic :: View next topic |
| Author |
Message |
Nils_Lars
Outlaw

Joined: 26 May 2006
Posts: 131
City: Santa Cruz
|
 Posted: Jun 28, 2006 6:20 pm Post subject: Video camera housing project Posted: Jun 28, 2006 6:20 pm Post subject: Video camera housing project |
 |
|
I shoped around for one and decided to make one on my own simply because I like messing with stuff , heres some pics of the pieces and assembled.
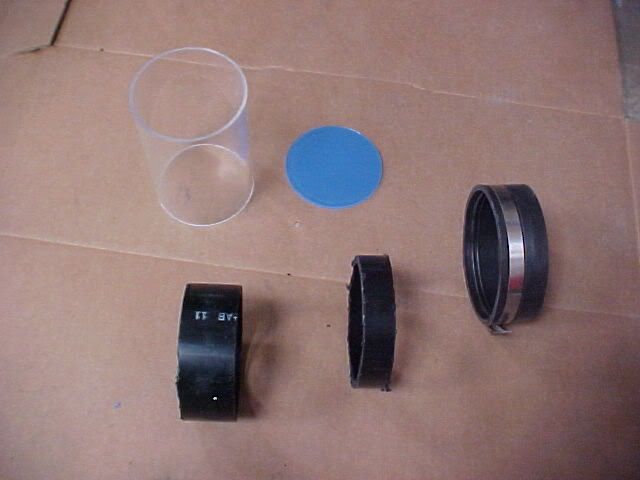
Ok the complete list of parts is (all of this is enough to make 2 housings)
First 3 items I got from http://www.tapplastics.com/
1ft of 4 inch Acrylic tube
2- 4 inch round circles of acrylic
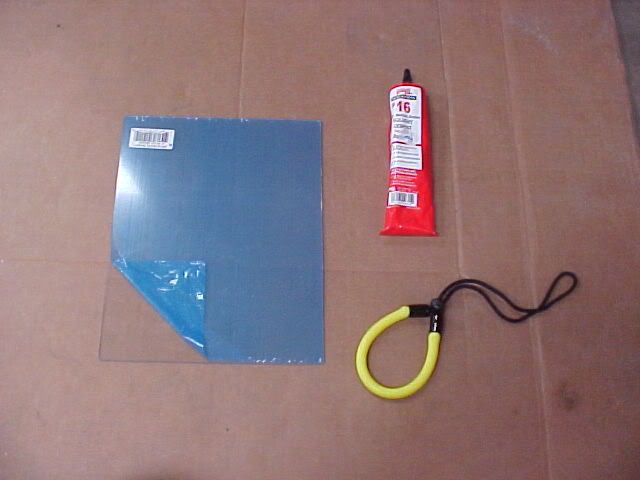
Medium body Acrylic cement / Weld-on #16
Rest is from local hardware store (Orchard Supply for me)
1ft of 4 inch PVC pipe
Sheet of Acrylic
2- 4 inch rubber plumbing caps
The leash I got from a dive shop for 5 bucks
I then had to cut the Acrylic tube in half since 6 inches was long enough to fit my camera and also big enough inside for it fit (Acrylic tube is 4in outer diameter PVC is 4in inner diameter)
Anywhere you cut the pipe make sure to sand it flat and smooth so glue dries and leaves no spots to leak.
I cut a few strips off the PVC for the ends and then had to sand the inside just a bit to allow for glue to fit on the Acrylic and put alot of glue on the inside of the PVC before sliding on the Acrylic (you gotta work fast , glue dries quick so make sure everything is in place before you do)
I drilled a hole in the PVC and cut a channel half the thickness deep on the inside and did a simple slip knot on the leash before glueing the larger ring on the Acrylic.
The front ring of PVC was just to make it look balanced but it made a good place to glue the hood on the front but you could get fancy and make the hood part of the front ring also.


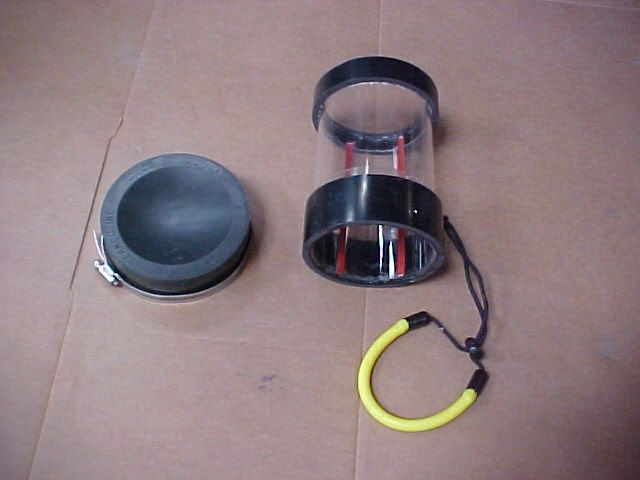
The rest of the pictures are included below like of the little tray that the camera screws to on the hole at the bottom of the camera that slides under the 2 strips that are in red on the last shot.
I might add a small mirror on a hinge on the side so I can see the LCD without looking at the side.
Check all the pictures here and in the post below and read everything before putting any glue on anything 
PM me if you got any questions or I missed anything.
_________________
Remember you're unique , just like everybody else
Last edited by Nils_Lars on Jul 07, 2006 9:03 pm; edited 1 time in total |
|
| Back to top |
|
 |
|
|
JeffR
Addict

Joined: 07 Apr 2006
Posts: 608
City: Victoria, BC
|
| Posted: Jun 29, 2006 10:43 am Post subject: |
|
|
| I am interested, send me any lists you got |
|
| Back to top |
|
|
Nils_Lars
Outlaw
Joined: 26 May 2006
Posts: 131
City: Santa Cruz
|
| Posted: Jul 07, 2006 8:06 pm Post subject: |
|
|
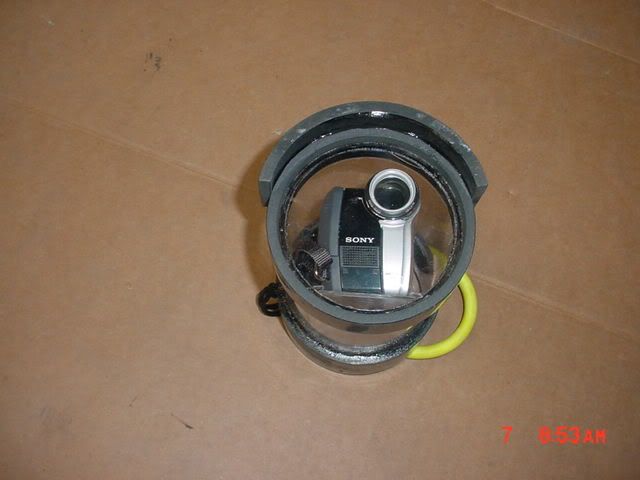
Ok so I added a few more parts and tested it by tying it to a anchor and leaving it at 20 ft for an hour and its bone dry so I think it can handle quite a bit of abuse.
It also floats and with the yellow leash on it shows up well in the water if it ever gets loose.
Heres the rest of the pics
This is with the strips of acrylic glued in the bottom to hold the plate the camera attaches to and also the rubber plug super glued to the back so it lines up with the record button and I can turn it on and off in the water.
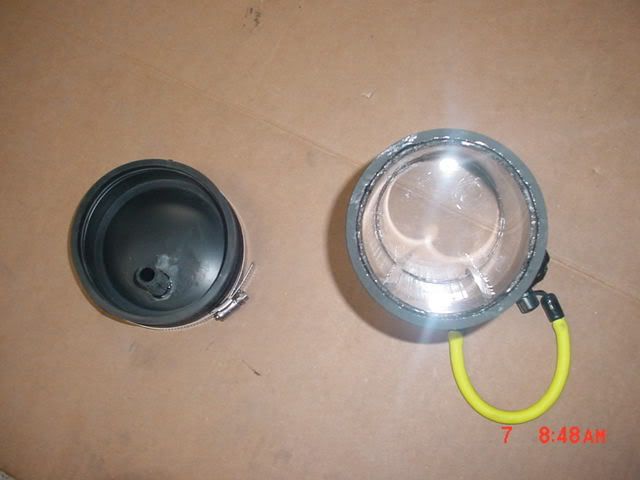
I had a bit of a problem with glare on the front so I added a small strip of the PVC pipe as a hood in the front and it works well.
This is the acrylic plate and screw to the bottom of the camera
Back view with the plate on the camera and it is under the strips , holds it nicely
Easy to see the LCD on the side of the camera even underwater
Then you just slide the rubber cap on the end and make sure you burp the air out as you do , then the hose clamp lines up with the double O-ring on the cap and tighten well with a screwdriver.
I had thought about buying this case for the remote to make it completly operational underwater but im not sure ill use all the other features but is handy if thats what you need.
http://www.weatherornotphoto.com/ewwpc5cephpo.html
_________________
Remember you're unique , just like everybody else |
|
| Back to top |
|
|
WHY
Outlaw
Joined: 27 Sep 2006
Posts: 138
|
| Posted: Oct 01, 2006 2:31 pm Post subject: |
|
|
thats is very impressive i would love to make a housing like that.
_________________
WHY |
|
| Back to top |
|
|
Nils_Lars
Outlaw
Joined: 26 May 2006
Posts: 131
City: Santa Cruz
|
| Posted: Oct 02, 2006 8:35 pm Post subject: |
|
|
Wasnt that hard and once I saw some of the parts I needed at local hardware store it motivated me to make it.
Ill bet you could find the size parts you need to fit any camera.
Send me a PM if you need any advice.
_________________
Remember you're unique , just like everybody else |
|
| Back to top |
|
|
Chad Chinners
Newbie

Joined: 30 Mar 2006
Posts: 35
City: Moncks Corner
|
| Posted: Nov 17, 2006 1:00 pm Post subject: |
|
|
| That's very impressive. How long did it take you to build? What kind of cost? |
|
| Back to top |
|
|
Nils_Lars
Outlaw
Joined: 26 May 2006
Posts: 131
City: Santa Cruz
|
| Posted: Nov 29, 2006 10:08 pm Post subject: |
|
|
Maybe 40 bucks and 2-3 hours
_________________
Remember you're unique , just like everybody else |
|
| Back to top |
|
|
andy mogg
Criminal

Joined: 04 Mar 2003
Posts: 99
City: Kaiserslautern/Mosel, Germany
|
| Posted: Jan 08, 2007 2:27 am Post subject: |
|
|
| I´m thinking about doing something like this, but was worried about turning the thing off and on and zooming. Any way to do this without opening the can? |
|
| Back to top |
|
|
Nils_Lars
Outlaw
Joined: 26 May 2006
Posts: 131
City: Santa Cruz
|
| Posted: Jan 09, 2007 12:43 pm Post subject: |
|
|
Yes 2 ways , one is the rubber button pusher plug I glued to the inside but you could also buy a cell phone water proof bag for like 30 bucks and put the remote control for the camera in it.
_________________
Remember you're unique , just like everybody else |
|
| Back to top |
|
|
andy mogg
Criminal
Joined: 04 Mar 2003
Posts: 99
City: Kaiserslautern/Mosel, Germany
|
| Posted: Jan 10, 2007 6:53 am Post subject: |
|
|
| The water proof bag sounds like a good idea, especially when using different cameras! |
|
| Back to top |
|
|
Nils_Lars
Outlaw
Joined: 26 May 2006
Posts: 131
City: Santa Cruz
|
|
| Back to top |
|
|
nickl011
Wakeboarder.Commie


Joined: 14 Jan 2007
Posts: 1711
City: Fargo
|
| Posted: Jan 17, 2007 8:17 pm Post subject: |
|
|
mabye u could point me in the right direction for making a new ipod shuffle case, i cant find any, not even universal ones
_________________
04 LF Trip 133
06 LF Transits
01 Cassette Series |
|
| Back to top |
|
|
|
|
|

