| View previous topic :: View next topic |
| Author |
Message |
jeeptchr
Newbie

Joined: 30 Nov 2009
Posts: 21
City: St. Joe
|
 Posted: Feb 17, 2011 12:13 pm Post subject: finally got around to starting a tower... Posted: Feb 17, 2011 12:13 pm Post subject: finally got around to starting a tower... |
 |
|
Well, after a year plus of thinking about it and finally getting some time set aside a couple of buddies and I started in on the tower for my 206 Rinker. Normally I know they are usually made out of aluminum, but having never bent aluminum tube we decided to stay with steel tubing as that's what we are familiar with (we do fab work for jeeps and rockcrawlers as a hobby). 2" tubing, a combination of .075 wall and .120 wall tubing. We found out that our 2 different tubing benders both have minimum wall thicknesses for any bends over 15 degrees. Not happy about the extra weight (difference of 12oz per foot for the main hoop 14' piece ) but there wasn't much I could do... however I have been looking at ballasting anyways, it rides nose high due to it being a CC.
Anyways, we still have to attach the tow point and the rear supports. any suggestions for the back supports, tow point we have a few ideas, but right now are just thinking about doing a rolled piece of 2" .075 for the upright and then a small angled trapezoid shaped box for the ball mount.
Also, because the windshield doesn't fold open I'm thinking about putting a windshield bar in just in front of the snaps so that there is something solid to step on when climbing onto the front of the boat to tie up.
Thoughts? Suggestions? Opinions on color? All critiques welcome!!

side mounts by jeeptchr, on Flickr
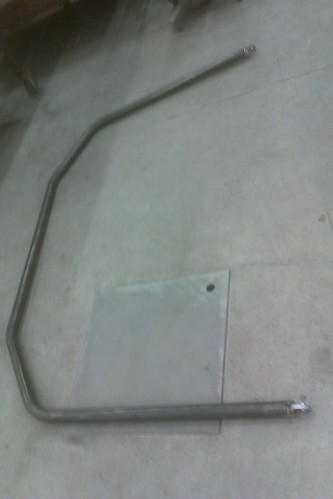
front by jeeptchr, on Flickr
back quarter by jeeptchr, on Flickr
sideview by jeeptchr, on Flickr |
|
| Back to top |
|
 |
|
|
Okie Boarder
Ladies Man


Joined: 03 Mar 2008
Posts: 10056
City: Edmond
|
| Posted: Feb 17, 2011 1:38 pm Post subject: |
|
|
Looks pretty good...seems to flow well with the lines of the boat.
_________________
If love is blind, why is lingerie so popular? |
|
| Back to top |
|
|
kartman
Wakeboarder.Commie


Joined: 29 Oct 2008
Posts: 1542
City: meridian, Idaho
|
| Posted: Feb 18, 2011 7:56 am Post subject: |
|
|
thats going to look really good when its done. you going to powdercote it when your done?
_________________
trying to find a $5-7K usable saltare if anyone knows of one. |
|
| Back to top |
|
|
supermanotorious
Soul Rider


Joined: 10 May 2010
Posts: 345
City: Phoenix
|
| Posted: Feb 18, 2011 8:53 am Post subject: |
|
|
looks good, how are you securing it to the hull? also, can you share your design for how the top of the tower attaches to the base? did you fabricate those ends or buy them and weld them in place?
_________________
☆PHOENIX WINCH☆
FACEBOOK
YOUTUBE |
|
| Back to top |
|
|
jeeptchr
Newbie
Joined: 30 Nov 2009
Posts: 21
City: St. Joe
|
| Posted: Feb 18, 2011 12:54 pm Post subject: |
|
|
Yeah that's the goal right now is to powercoat it. The debate is between yellow, black and annonized alum right now.
Using captive (welded) nuts on the back of the mounting plates. We actually recessed the mounting surface flush with the tube welded it then ground it down flush. 1/2" bolts thru the hull with a 15/32 piece of 5 ply plywood with fiberglass gel resin adhered to the inner hull then a metal backing plate/washer on it to distribute the load. I actually haven't made them yet, maybe this weekend. I'm going for at least a 40 sq in. surface area on the plywood. Using rubber semi mudflap for the isolator bushing between the hull and the base. also both front mounts have a hole drilled through them for wiring to run up from inside the hull.
Couldn't find the ends anywhere so I had a local machine shop make them and then we pressed high misalignment heim inserts into the tongue part of the assembly, then welded them to the tubing. I'll attach the print for the parts.
Like i said we are still debating on the back support assembly, right now we are thinking about a socket type system with a piece of 2" tubing rolled, but I was debating about using some 1" there. Either way it'll use either threaded knob's or speed pin's to hold it together.
The design started off as a model of the Samson razor but the windshield lines wouldn't allow for that exact design so we started crossing it with the edge design also. We're pretty particular when we build anything it has to "look" and function. That age of boat is kinda unique as it's still a bit more angular but is just starting to introduce curves to the boat design. |
|
| Back to top |
|
|
jeeptchr
Newbie
Joined: 30 Nov 2009
Posts: 21
City: St. Joe
|
| Posted: Feb 18, 2011 12:58 pm Post subject: |
|
|
| attached is the clevis and tongue assembly. |
|
| Back to top |
|
|
supermanotorious
Soul Rider
Joined: 10 May 2010
Posts: 345
City: Phoenix
|
|
| Back to top |
|
|
4theHIGH
Newbie
Joined: 15 Feb 2011
Posts: 2
|
| Posted: Feb 22, 2011 11:14 am Post subject: |
|
|
Awesome. Been wanting to fab my own for some time now, and just started doing the research into it. Im no master fabricator, but my roommates pretty talented. We have the same fab interests (Jeep/Crawlers) working on a set of Tube Fenders for my LJ right now. Where are you located?
Anyways. Was so bummed when I realized we had to have a TIG for alluminum. This inspires me though. Hows the weight of the steel? Just worried about it being too heavy. Want to make this happen so bad. Dying for a low budget tower for my cobalt. Plus I just want a project! 
_________________
"Hey! Don't punch her in the face. She'll bleed like a stormtrooper." |
|
| Back to top |
|
|
jeeptchr
Newbie
Joined: 30 Nov 2009
Posts: 21
City: St. Joe
|
| Posted: Feb 22, 2011 12:12 pm Post subject: |
|
|
BTW supermanotorious, the part # for the misalignment bushing is
HIn8 from www.rodendsupply.com it's on page 12 of their catalog.
I'm located right north of Kansas City, been fabbing for quite a few years, one of the rig's that is pretty well known that I've worked on is the Rubberbelly Racing tracker, they compete in the WeRock Series. you actually don't have to TIG aluminum you can MIG it but for something like this I wouldn't recommend it. The weight differential added up a bit when I went to the heavier tube so we could bend it (all that was available was 120 wall. the main hoop and the forward base mounts are made out of 120 and the back leg and (to be made yet) upper rear supports will be made from .75 my calucations put us somewhere around 100lbs for the entire tower, with the 120 wall and joints listed above counting for approx 64 lbs. If we add the windshield crossbar in that will bump just a touch more weight. I really want to add it in for crossbracing (that's the jeep fab side coming out in me.
not too bad especially with how set back the cockpit is on my rinker, that cuddy takes up a lot of space. so I'll never have more than 5 in the boat at a time.
all total I have 130 bucks in the joints, 5 sticks of 075 wall was 100, and 3 sticks of 120 wall cost me 150. (gotta get extra, we effed the main hoop by 5" too narrow the first time. Shouldn't be bending tube at 2:00 in the mornin... 
adding in little stuff I have about 400. but it's custom fit and will look "Right" when we are finished. we're also going to add a few trick pieces like slip on cradles for the main hoop to lower rear mounts for trailering with the tower down. and putting it in the garage. without resting the tower on the cover or the seats.
If I would have had the time to get the thicker tube I would have looked for some .095 wall as a good compromise but I didn't have the time as buddies were driving in from out of town to help.
I need to put a set of tube's on my TJ I have the die I just haven't bent them up yet. That's been going on bout 4 years. there's pic's of it on www.jonesmudfest.com it's the white TJ on SX's in a bunch of the pic's where are you guys located at?
here's a good reference for tubing weights http://www.auto-ware.com/techref/tubeweight.htm |
|
| Back to top |
|
|
supermanotorious
Soul Rider
Joined: 10 May 2010
Posts: 345
City: Phoenix
|
| Posted: Feb 22, 2011 1:12 pm Post subject: |
|
|
I cant figure out why you needed the misalignment bearings, looks like the machined ends are just welded to your pipe
_________________
☆PHOENIX WINCH☆
FACEBOOK
YOUTUBE |
|
| Back to top |
|
|
jeeptchr
Newbie
Joined: 30 Nov 2009
Posts: 21
City: St. Joe
|
| Posted: Feb 22, 2011 1:20 pm Post subject: |
|
|
| Basically we just made a large heim joint and a receiver for it. They are on the butt end, but to connect the two parts together to make a hinge (to lay the tower down giving tolerance for the changing angles at the pivot point as the tower lays back). You need a bushing of some sort, that bearing presses into the tongue part, and then the clevis fits over the bearing. i'm not near them right now or else I'd shoot you a pic. by using the misalignment bearing we got approx 20degrees of available misalignment for the changing angles. |
|
| Back to top |
|
|
supermanotorious
Soul Rider
Joined: 10 May 2010
Posts: 345
City: Phoenix
|
| Posted: Feb 22, 2011 1:45 pm Post subject: |
|
|
please do, I think I get it now but would def like to see the pics, I take it since the upper hoop is angled into the boat, once you fold it down there is misalignment, did you need any special tools to press the bearing into the clevis assembly? can you take any pics of the hull mounts both inside and out?
_________________
☆PHOENIX WINCH☆
FACEBOOK
YOUTUBE |
|
| Back to top |
|
|
supermanotorious
Soul Rider
Joined: 10 May 2010
Posts: 345
City: Phoenix
|
| Posted: Feb 24, 2011 1:34 pm Post subject: |
|
|
so my CNC guy doesn't want to do this for me, what would you charge to do it for me?
| jeeptchr wrote: | | attached is the clevis and tongue assembly. |
_________________
☆PHOENIX WINCH☆
FACEBOOK
YOUTUBE |
|
| Back to top |
|
|
jeeptchr
Newbie
Joined: 30 Nov 2009
Posts: 21
City: St. Joe
|
| Posted: Feb 24, 2011 7:51 pm Post subject: |
|
|
| The guy I used was kinda a sub for my main guy (it was a buddies buddy, you know those deals), I'll run the print to my normal guy this next week and see what he says. |
|
| Back to top |
|
|
chawk610
Addict


Joined: 06 Jul 2010
Posts: 668
City: Fort Worth
|
| Posted: Feb 25, 2011 4:37 am Post subject: |
|
|
There is a guy on the forum that specializes in this kinda stuff... trying to think of his name.... Makes all kinda cool stuff... he has a machine shop... I will try to remember his name!
_________________
'08 Mobius LS |
|
| Back to top |
|
|
chawk610
Addict
Joined: 06 Jul 2010
Posts: 668
City: Fort Worth
|
| Posted: Feb 25, 2011 4:44 am Post subject: |
|
|
www.leftfieldengineering.com is his site... I can't remember his forum name...
_________________
'08 Mobius LS |
|
| Back to top |
|
|
supermanotorious
Soul Rider
Joined: 10 May 2010
Posts: 345
City: Phoenix
|
| Posted: Feb 27, 2011 7:59 pm Post subject: |
|
|
thanks jeep ans chawk, this has been a huge inspiration and I will do this myself, I weld and can bend pipe but have always been challenged by the feet and joints
_________________
☆PHOENIX WINCH☆
FACEBOOK
YOUTUBE |
|
| Back to top |
|
|
jeeptchr
Newbie
Joined: 30 Nov 2009
Posts: 21
City: St. Joe
|
| Posted: Mar 11, 2011 8:16 pm Post subject: |
|
|
No worries superman, that's what the site is for. I always tell people if they can draw it I can build it 
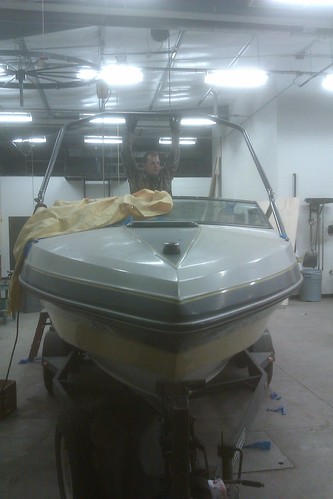
Took the boat to the shop this eve. After tommorow I should have some new pic's to post up. we should finish the build tommorow and then off to the powercoaters next week or so
btw I haven't made it to the machinists yet, but I think the machine work should be around 85 per set. let me know if you still want me to get an exact. |
|
| Back to top |
|
|
jeeptchr
Newbie
Joined: 30 Nov 2009
Posts: 21
City: St. Joe
|
| Posted: Mar 13, 2011 8:34 pm Post subject: |
|
|
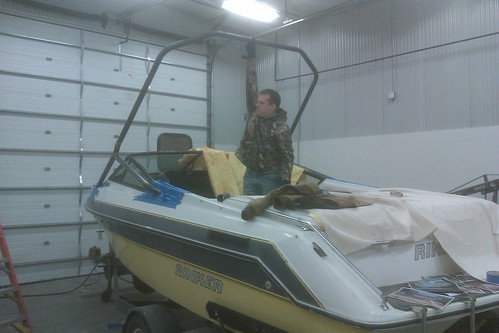
Well, here's the final result. I didn't powerdercoat it yet, we are going to run it a month or so and see if we need to make any changes before I spend the money on coating it.
There are some build pic's and some final result pic's.
The worst is yet to come. I have to detail the boat back out, I covered all of the interior with canvas drop cloths but you know how they get moved. lots of cleaning interior and out to get the grease/oils removed. I hate white.. |
|
| Back to top |
|
|
jeeptchr
Newbie
Joined: 30 Nov 2009
Posts: 21
City: St. Joe
|
| Posted: Mar 13, 2011 8:34 pm Post subject: |
|
|
| some more pic's |
|
| Back to top |
|
|
jeeptchr
Newbie
Joined: 30 Nov 2009
Posts: 21
City: St. Joe
|
| Posted: Mar 13, 2011 8:37 pm Post subject: |
|
|
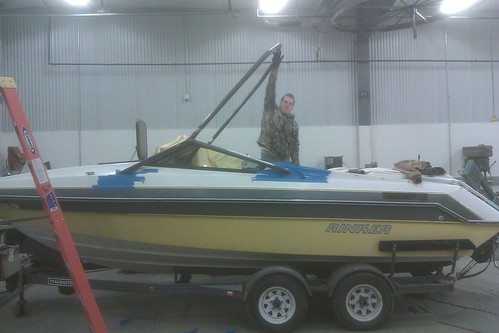
| finished product |
|
| Back to top |
|
|
jeeptchr
Newbie
Joined: 30 Nov 2009
Posts: 21
City: St. Joe
|
| Posted: Mar 13, 2011 8:41 pm Post subject: |
|
|
| Don't even ask how my back is after doing the 4 rolled pieces.... I think i spent 4 hrs rolling tube for the sweeps. If I ever buy a roller for my shop it'll have a motor mounted to it.. |
|
| Back to top |
|
|
jeeptchr
Newbie
Joined: 30 Nov 2009
Posts: 21
City: St. Joe
|
| Posted: Mar 13, 2011 8:47 pm Post subject: |
|
|
On the to-do list. Wire for lights and sound. order screw knobs for the "b" pillar connectors. get some board racks. And make the lay down supports into travel cradles so that you don't have to have the tower in the upright position for transport. I need to make some saddles out strapping and pad them so that they will be pinned in place.
Thoughts on folded down transport.? I travel a lot of 2 lane "country highways and the blacktop sometimes isn't the smoothest. |
|
| Back to top |
|
|
fd2blk
Criminal

Joined: 23 May 2010
Posts: 82
|
| Posted: Mar 14, 2011 12:49 pm Post subject: |
|
|
| That thing is awsome, I love the way it collapses. BTW I have a buddy with a CNC that I am sure could make those if anyone needed a set |
|
| Back to top |
|
|
supermanotorious
Soul Rider
Joined: 10 May 2010
Posts: 345
City: Phoenix
|
| Posted: Mar 14, 2011 1:59 pm Post subject: |
|
|
looks awesome, can you get pics inside the hull where the tower mounts to fiberglass?
_________________
☆PHOENIX WINCH☆
FACEBOOK
YOUTUBE |
|
| Back to top |
|
|
jeeptchr
Newbie
Joined: 30 Nov 2009
Posts: 21
City: St. Joe
|
| Posted: Mar 15, 2011 5:58 am Post subject: |
|
|
Thanks guys. I can't wait to get it on the water and try it out, none of the bunch including myself have ever been pulled by a tower.
Will do, it'll be a few days before I get them snapped. I head out of town for a conf, and then I'm going wheeling this weekend |
|
| Back to top |
|
|
brichter14
Addict
Joined: 27 Apr 2008
Posts: 705
|
| Posted: Mar 21, 2011 5:47 pm Post subject: |
|
|
It makes a huge difference. Enjoy.
_________________
Lake Shelbyville, IL |
|
| Back to top |
|
|
CJFinkle
Newbie
Joined: 27 Mar 2011
Posts: 19
City: SF Bay Area
|
| Posted: Mar 27, 2011 4:01 pm Post subject: |
|
|
To my amateur eyes, it looks like like you an awesome job! Lots of respect to people like yourself who take on projects like this. Let us know how it works out for you.
-CJ
_________________
Looking For A Way To Organize Your Boarding Sessions & Find Out Who's In Or Who's Out?
http://www.RivalZone.com/
Get In Here. Create Events. Invite People. |
|
| Back to top |
|
|
jeeptchr
Newbie
Joined: 30 Nov 2009
Posts: 21
City: St. Joe
|
| Posted: Apr 06, 2011 11:22 am Post subject: |
|
|
Thanks, and will do!
Supermanotorious
Next week I should get some time to pull it out and start the detailing job. I'll get pic's of the mounting plates then. |
|
| Back to top |
|
|
Ski Supreme
Criminal
Joined: 10 Mar 2012
Posts: 50
City: Las Vegas
|
| Posted: Mar 20, 2012 1:41 pm Post subject: |
|
|
| supermanotorious wrote: | | looks good, how are you securing it to the hull? also, can you share your design for how the top of the tower attaches to the base? did you fabricate those ends or buy them and weld them in place? |
With blue tape. LOL |
|
| Back to top |
|
|
|
|
|

